A Girl Scouts Bridging Ceremony is held when Girl Scouts move from one level of scouting up to the next (such as Brownie to Junior, or Junior to Cadet).
There are many ways to make a bridge for a bridging ceremony. It can be elaborate or simple, or you can even use a real bridge outdoors for your ceremony. If your ceremony is indoors, you’ll need some sort of prop. Here are TWO EASY BRIDGES. A Pallet bridge and a Ribbon Bridge.
Easy Pallet Bridge
We needed something simple, not too heavy, easily transportable, and something that the girls could help build themselves. This does not require any actual construction, but you will have to gather some materials.
Here’s how our Girl Scout Troop made our bridge:

We used three wooden pallets like this that were donated by Wal-Mart. Just go to the loading area around the back of the store and ask if they have any that they can give you. (They cannot give away the painted ones, but they usually have others that they will be happy to donate if you tell them it’s for your scout group.)
The pallets are never connected together or the entire process which makes them easy to transport in a car and set up at the ceremony site. It was not necessary to attach them to each other at all. The basic structure is built by simply laying two of them on the ground and the third one across them, like this:
To make them easier to walk on and to look nicer, we covered them with cardboard using a staple gun. The girls painted the cardboard brown.
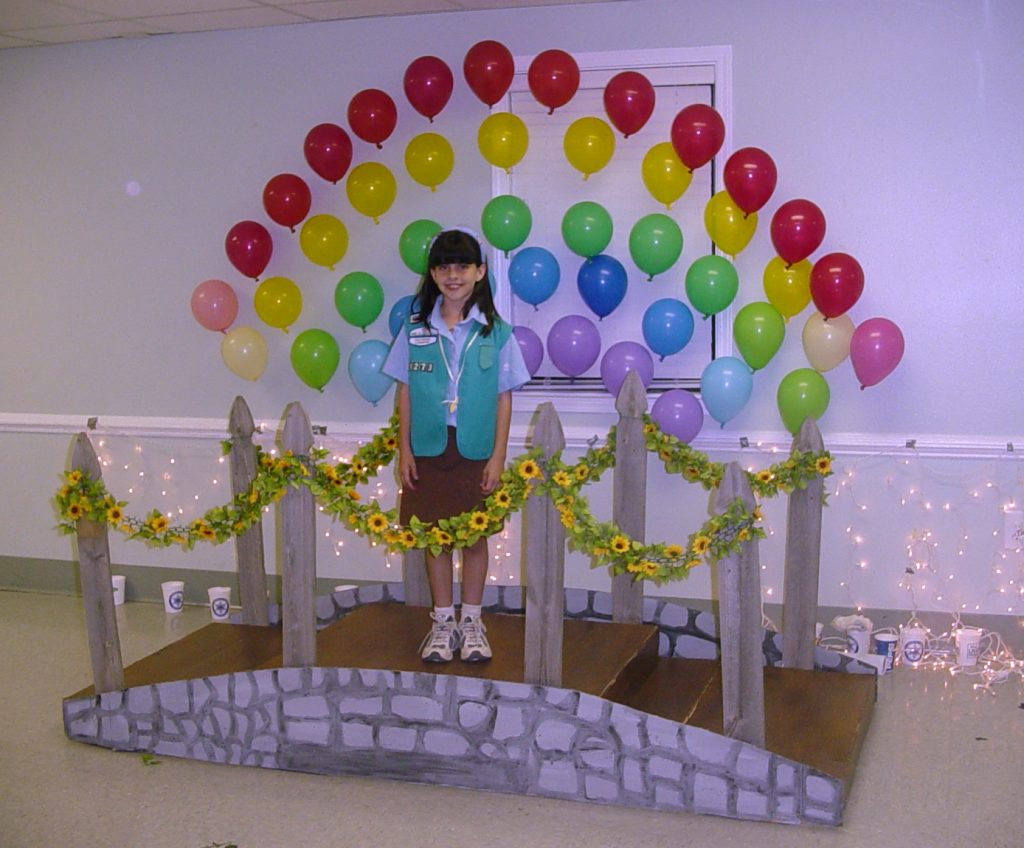
This probably would have been enough, but we wanted to have hand rails as well to make it pretty. We were given eight cedar fencing slats from a neighbor who was removing part of his garden fence. We used smaller scraps of wood, to make four simple slot areas on the sides of each of the two bottom pallets. This made it easy to slip the vertical slats in at our meeting place without having to nail them on permanently. They could probably be attached using a couple of screws during the set up if that is easier.

Then we strung a flower garland across them. A daisy flower garland was been ideal, in honor of Juliette “Daisy” Gordon Lowe, the founder of Girl Scouts.
To make it even fancier, then the girls used two more big pieces of cardboard and painted them using some small paint brushes, to look like stones for the sides of the bridge. We tied them on using some wire once the bridge was set up.
Behind the bridge, we made a rainbow of helium balloons strung on fishing string. It was a great backdrop for taking pictures after the ceremony.
Easy Ribbon Bridge
Here’s another bridging ceremony bridge that we made a different year. It’s much easier to transport, and very small for storage. There is no building or construction needed at all.
This one is easy to store, takes up very little space, and can be used year after year. After it is constructed, setup takes less than a minute!

Materials Needed:
- 2 yards of rainbow fabric, cut into strips as shown
- 2 daisy garlands (6′ long each), cut into 8 pieces each
- 8 large wooden dowels
- 8 plastic tumblers
- 6 lbs of plaster of paris
- 8 pipe cleaners
Total cost for all materials was just under $40.
First, we took four of the dowels and cut a few inches off them to make them a little shorter for the ends of the bridge. We mixed the plaster of Paris and filled all the tumblers about 2/3 full, then inserted the dowels when it started to set.
Next, we used the pipe cleaners to tie the strips of rainbow fabric to the tops of the dowels. Then, we tied a bunch of daisies to the dowels using the same pipe cleaners, and put more daisies in the tumblers as shown.
This was easy to set up since it was all tied together when we arrived for the ceremony. We just carted it around in a smaller box. The girls just walked through the colorful “handrails” to the other side. Each girl received her new uniform and had to tell their favorite memory from that phase of Girl Scouts.
Here’s a photo of our bridge in action! The Cadette Girl Scouts made an arch of colorful helium balloons for the bridging girls to walk through as they pass over our bridge. You can see our candles in the background which were part of the ceremony, and we hung our troop banner behind the bridge so it would look cute for pictures.

When you are planning your ceremony, there are lots of other ideas to use for the ceremony its self at Girl Scouts.org
Have fun at your Girl Scout bridging ceremony!

